[The Complete guide] How to Look Your Best in Photos
Article by Maddison McKinley. The products featured in this article were sourced independently and chosen for the benefit of the reader. Daily Inspirato doesn’t financially benefit if you buy any of these products.

Look at how fun this posture is! I love looking at old record album sleeves for inspiration, and this one was no exception.
Preface: I recently asked the @DailyInspirato followers what they most wanted me to write about and “how to look good in pictures” was one of the top requests. Is there an area of Clothing Confidence you want to know more about? Email me or DM me on Instagram.
We All Want to Look Good
We all want to look good in the pictures our beautiful faces are featured in.
And photos are important. Not only do they capture a memory that Facebook will remind you of in a year or two, but they are also what grandma sticks on the mantle for posterity. They are what your potential employer might see when they Google Image search your name. They are what you will show your grandkids to prove you really were young once.
Whether it’s for a school print, a Google Meet screenshot, an engagement photo, a family gathering we want to remember, or a selfie with friends, we want the outcome to be “oh, I look good.”
In some of these cases, you will have a photographer coaching you along the way: “tilt your chin up a bit … there!” In others, your aunt is giving you three seconds to pose before your nephew begins sobbing.
In cases like the latter, we only get a few shots to choose from, so we have to make them count.
I’ve partnered up with Jessica Webb of Jessica Webb Photography in Portland, Maine to talk through some quick tips you can mentally check off right before you take a photo.
Tips to Remember Before The Flash Fires
Skin
Posture
Smile or Smirk
4Cs
Skin!
Makeup
Ladies, I recommend wearing makeup as it’s helpful for skin color correction. No matter how religious we are with our skincare routine, our cheeks and forehead don’t always look even in color. Makeup is there to make that flawless face. And the little things, like a bright lip, show up beautifully in photos. The bottom line: when you wear makeup, you’re helping the camera define your features.
If makeup feels like a big question mark, watch this makeup video I created using simple products and a simple process.
If you’re a hard pass on makeup at all, consider at least amping up your lips.
Lip Gloss
If you’ve seen my makeup video, then you know I love Elf products. Even if you don’t like makeup, apply this lip gloss before taking a photo to make your lips look healthy!

Lip Stick
If you really want to take it up a notch, throw on some lipstick. This line of lipsticks by Revlon is my absolute favorite. It has a gloss-like applique.

Moisturize!
Make sure your skin is moisturized (face, lips, and other exposed skin). It’s the cheapest, easiest, thing you can do to improve your face for photos
Moisturizing Process
My best tip for making sure my skin looks fabulous during a shoot is to moisturize the living daylights out of my skin the night before.
Here’s my process (see the accompanying products below).
The night before I...
Remove all makeup very well using this Neutrogena Oil-Free Makeup Remover.
Take a shower using La Roche-Posay Facial Cleanser.
Lotion my fulllllll body using Aveeno’s Daily Moisturizing Lotion.
Apply a heavy layer of La Roche-Posay face lotion, and lip balm.
After this routine, my skin looks and feels dewy and smooth the next day. When I go to apply makeup (after cleansing off the lotion from the night before, of course), my skin is positively radiant.
I’m not a skin expert, so while I’m sharing these products, know that you’ll need to find the best ones that work for your unique skin. Consider seeing a dermatologist for a consultation, especially if you have problem or sensitive skin.
I have been in love with La Roche-Posay ever since I found their lip balm on a trip. Upon using their product, I realized that I’d never had a moisturizer that actually moisturized as well as these products. I won’t be smelling like a pomegranate that just walked out of Bath and Body Works, but my skin will feel amazing for a lot longer.
Makeup Remover
Use a makeup towel to reduce waste, as opposed to cotton swabs.

Facial Cleanser
This doesn’t get makeup off, so I’ll usually remove that first, then use this in the shower.

Lip balm
Apply liberally at night.

Face Lotion
This is the lotion I use on my face at night.

Body lotion

Posture!

Standing tall can feel awkward, but it will make you look 10x better.
According to the American Chiropractic Association, posture is “the position in which someone holds their body when standing or sitting.”
We interpret about 65% of a person’s messaging through their nonverbal communication. Things like gesture, facial expression, and yes, posture help us communicate, and photos are no exception. You’re capturing your posture in a photo and making it permanent, so you want to make sure you’re conveying what you wish to convey!
If your shoulders are slumped, we’ll think you feel defeated or tired or even sloppy. If you’re standing up tall, we’ll read you as confident.
The saying, “a picture is worth a thousand words” is a widely known phrase for a reason. Through a photo, we can relate an entire story.
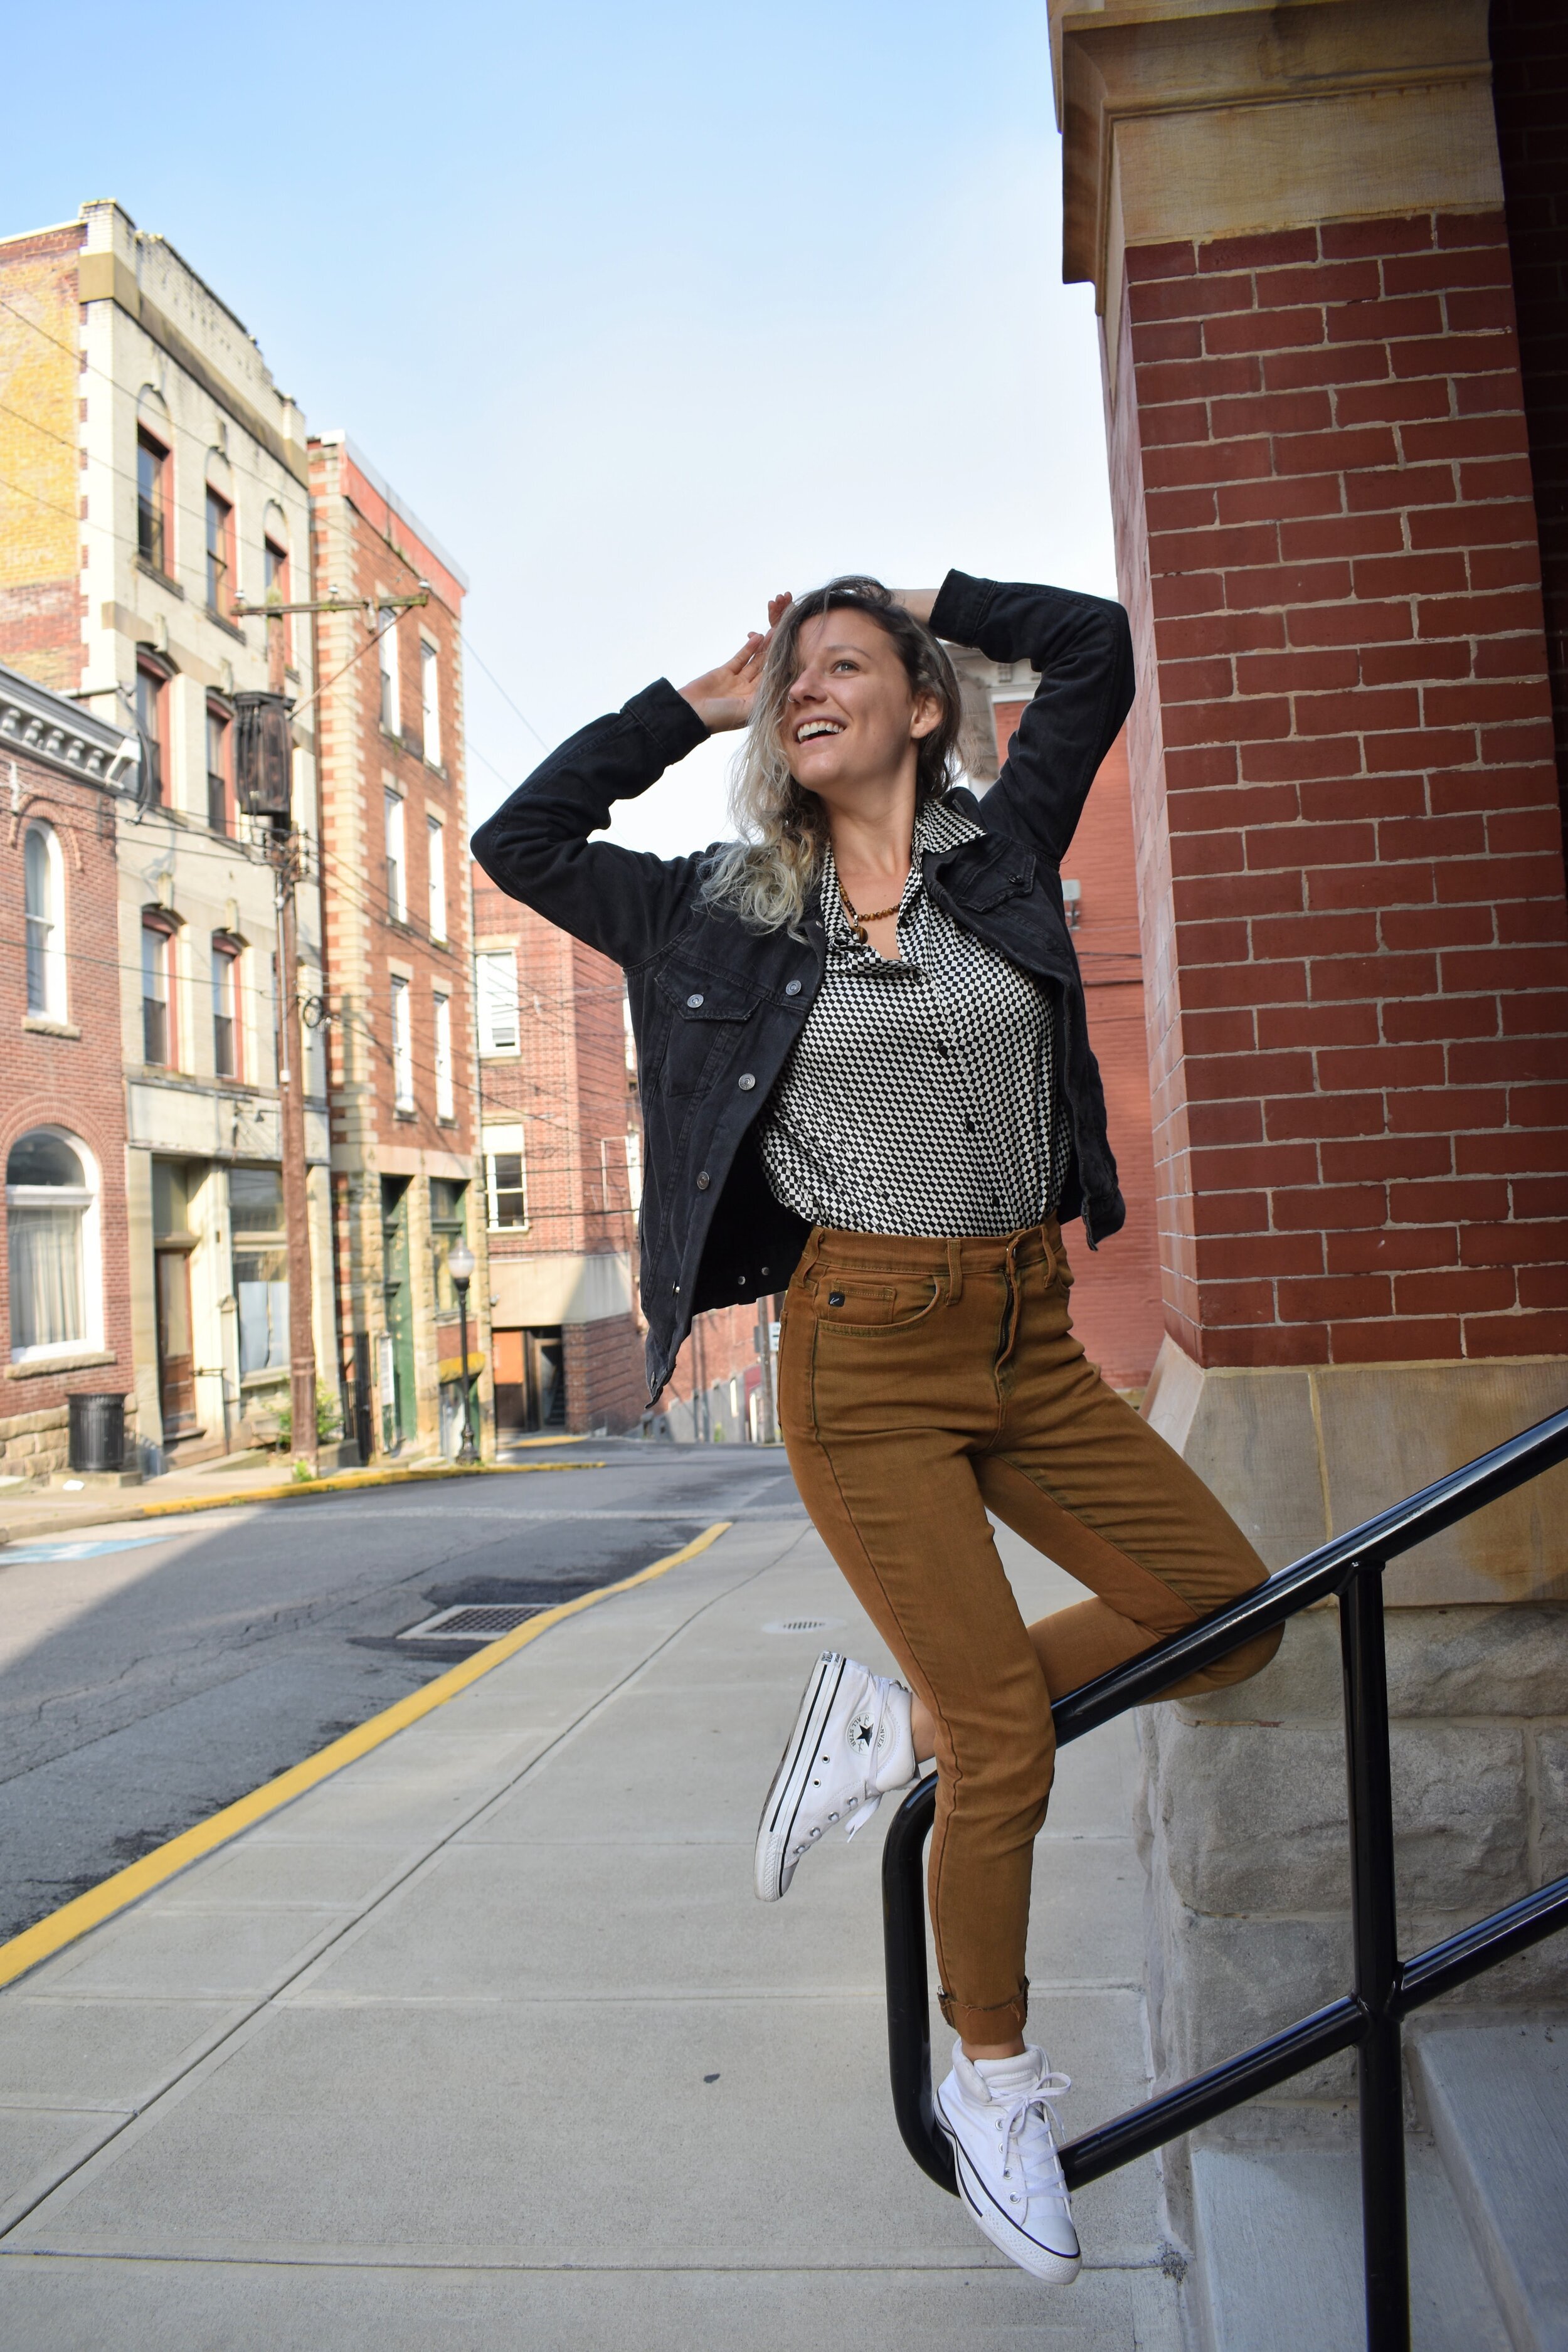
For example, with the photo above, there’s a certain mischievousness about my posture: I am standing straight, my body completely facing the camera, one hand on my hip, wearing a large smirk, and a tilt in my head while staring at the camera.
“Look what I found...”
“Just wait until you see…”
“Yeah, not so smart are ya…”
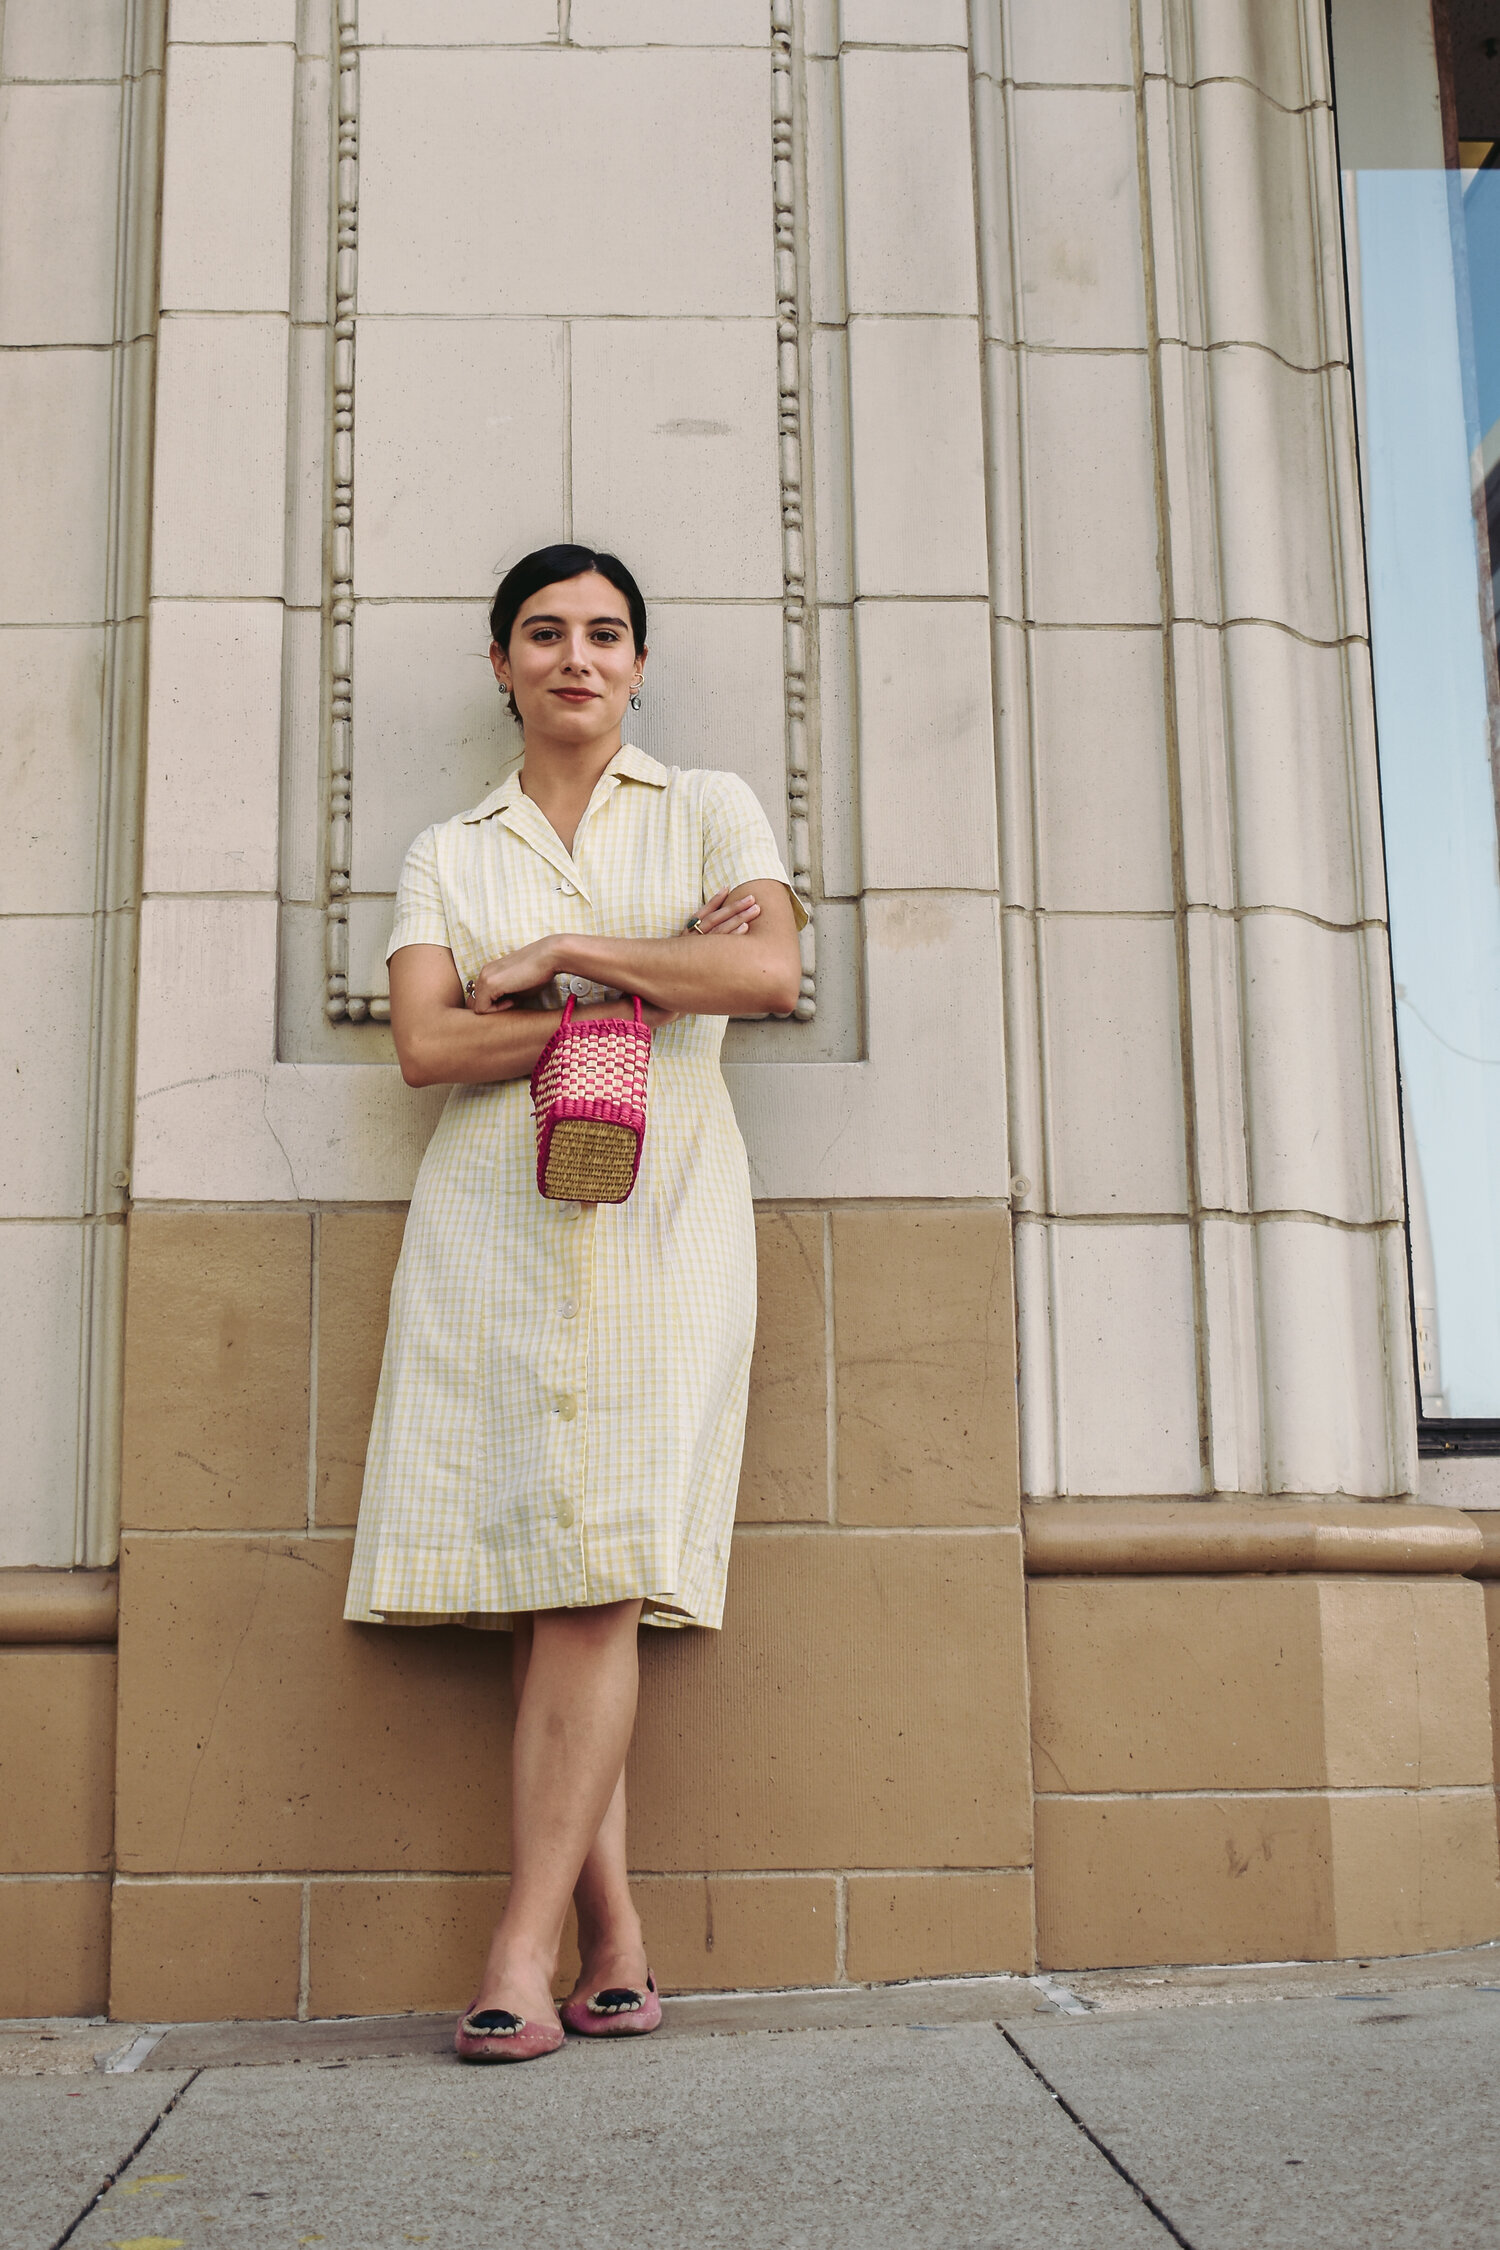
And just with a few changes, I can then go into a much softer pose, like the one below:

Here, I’ve crossed my arms (a defensive posture), knocked my hip back, am wearing a soft smile, and am stepping more towards the camera. I appear much more open and perhaps even shy than the previous photo.
Our posture is key!
Shoulders, Neck, and Back
Stand as tall as you think you can, and you’ll surprise yourself with how much more confident and fantastic you look.
“Pretend there’s a string coming out of your head, pulling you up.”
… this includes your shoulders and your neck.
Many of us think we’re standing up straight, but we collapse into our bodies more than we think (and those darn iPhones aren’t making anything easier).
Push those shoulders back, lengthen your neck, and stand your back up as straight as you can.
Do you feel the difference? It may feel strange at first, but you’ll get used to it! (And maybe even adopt it?)
Face and Chin
Avoid pointing your chin upwards too dramatically as you won’t want to have your nostrils on full display. Play around with different face and chin positions, but don’t lean your face back or forward too much.
In the photo above, notice my chin/face are facing off to the side, but my chin is still facing the camera at about camera height.
I can hear someone out there saying “but what about my double chin?” Instead of leaning forward, try to make your neck feel as long as you can and see which kind of smile makes you feel most comfortable and shows off your neck best. I find that if I smile too big, my triple chins come out to say hello very quickly, hece my adoption of the smize.
But What Do I Do With My Hands?

Lindsay laughing, and fixing her hair, looking natural.


Here, my hands are going through my hair, resting on my hip and on my leg, or in a pocket.

Cecily used the prop of a staircase handle like an expert, while I leaned on the gas station pump.

Fernanda crosses her arms high, and low, both creating an elegant silhouette with her body.
Now that you’re standing up straight, you may think, “but I look stiff”.
The most stark indication of our stiffness will most surely become present in our hands.
Not to worry, the opportunities for what to do with our critical appendages are endless.
On the hips (with an arm pop)
Laid in lap (if sitting)
All your fingers in your pocket (don’t do a finger in/finger out)
Comb or touch your hair
If you have a prop close by, try to organically work with it. (See the gas station pump?)
Cross your arms. Be mindful that you don’t want to come off as “angry” with this one. See how Fernanda gingerly places her fingers over her arms? She looks more “queen” and less “intimidator.”


Jess recommends movement in photos because it’ll help you feel more natural. If you can walk towards the camera, move around in one place, you’ll likely flow into a place where your hands feel natural. If you’re in a family photo, you can wrap your hands around someone else.

Fernanda fixing her hair, with her left leg slightly popped out, and the other arm resting on thigh makes for a beautiful silhouette!
Legs
I often like photos where one leg is more in front of the other and in line with the other leg, with hips popped. Or, the ones where I pop a leg out front, because while my posture is straight, it makes the lower half of my body look smaller (which I prefer).
If You’re Sitting
“Sit towards the front edge of the chair”
The ladies behind Seeking Inspriato series do this so effortlessly (and with a little of Jess’s help 😉).
See how they cross their legs? They look so elegant and comfortable. Billie balances her hand on a nearby chair, with the other holding her knee. Elise crosses her legs behind her, gripping a mug (perfect prop), and rests a hand on her thigh.


Here are some more sitting options, and these are a little more laid back. This viewpoint with Chanda is fun because she looks totally in her environment, like you’re sharing a pizza with her while watching The Bachelor. Chanel looks cool and confident.


To Smile or to Smirk?

Kathryn with a real, big, and bright smile.
Sometimes Jess will ask the people she’s photographing to,
“Give [her] a side smirk.”
This will usually make people laugh, which also creates a great photo.
“I want to see who someone is naturally.”
Do you like your smirk, or your full smile, in photos? I like a good smize myself, but a big bright smile is timeless.
When in doubt, the “sorority smile” always works and does make for a great photo (look into the distance and think of something funny). Kathryn does this beautifully in the pink photo above.
Cut, Color, Cloth, and Comfort
You know we have to talk about the 4Cs. Not only are they the Daily Inspirato trademark, but they are also critical to taking a good photo!
The clothing and accessories you chose to wear in a photo can either make or break your appearance. We want the cuts to complement your figure, the colors to make your skin pop, the cloth to feel good on you (and be camera-appropriate), and for you to feel comfortable so you can be as natural as possible.
Let’s go through each of the 4Cs and ask ourselves some key questions to prepare for our next photo op!
Cut
Which Cuts flatter my face shape best?
Which Cut is appropriate for this photo?
How much chest do I want to show? Legs?
Thankfully, there are a few neckline Cuts that work for just about everyone.
Necklines for Everyone
The 5 options below will work flawlessly on anyone.

V-Neck
*LARGE BUST: Wear a cami underneath for full protection.
*GREAT FOR DEFINED JAWLINE

Sweetheart
*SMALL CHEST: May find that this style gives them more curvature and the appearance of having a larger chest.
*GREAT FOR DEFINED JAWLINE

Halter
*BROAD SHOULDERS: Great Cut for making a broad shoulder look more narrow.
Square
*CHEST: Square necklines will make larger chests appear very large. If you’re small or medium chested this can be a good shape if you want to accentuate your chest.
*BROAD SHOULDERS: This can create the illusion of smaller shoulders.

A High Boat
*WORKS FOR EVERYONE: Conservative cut that is flattering on all face, shoulder, and bust types.
You’ll have to determine for yourself if you want to wear long or short sleeves, where you want the waist to cut (an a-line, empire, or wrap are flattering on nearly everyone), how long you want the dress to be, and if you want it to be form fitted or not.
When it comes to photos, we want to see your silhouette, so don’t go running to a bean sack! Define your figure in the best Cut for you.
Color
Jess recommends choosing neutrals like gray, or soft blues for cool skin tones. “Burnt tones” always look great in photos and are especially recommended if you have a warm skin tone.


It’s probably smart to just stay away from patterns.
Remember that your photos freeze you in a moment in time and travel with you to the future. Not all patterns create the timeless quality you’ll want in some photos, but there are timeless patterns to consider (think houndstooth). In photos though, patterns can be distracting. They’ll cause viewers to focus on discerning whether that is a leopard or cheetah print instead of focusing on your face.
Cloth
Avoid shiny textiles as flashes can add complexity to the photos.
Go with the Cloth you most prefer! I like organic fabrics as they feel best on my skin, but also like when synthetics are tossed in (cotton + spandex).
Comfort
This is the most personal part of the process. What are you uncomfortable exposing? What do you want to show off? (Aside from your face, we all have something else worth showing off!) Maybe you have killer legs –– please do the world a favor and wear something that shows them off!
I always wear long sleeved shirts in pictures because I don’t like exposing my arms. I know this, and specifically plan for it when I can (and when it’s not 98° outside).
What I’d Wear Based On My 4Cs
Based on my 4Cs, below are a few dresses that would be the safest bets for how I’d want to show up in pictures.
Cut: The V necks are my personal favorite, but I’d choose the high neck for family photos as I have a larger chest and don’t love camisoles (though they’re a great option for most people).
Color: I love green, navy, and black. They’re good low-key colors for photos.
Cloth: The dresses are made from cotton, rayon, or spandex … a few of my favorite textiles.
Comfort: With these options, I’m concealing my arms and legs. With the shorter dress, I’d wear nylons.
Great Dresses to Wear for Photos


Of course, I’d accessorize, accessorize, and accessorize with statement earrings, hair pieces, and belts.
I’d pull my hair back with some bobby pins, wear the statement stud below, and don the belt with any of the above dresses!
Fun Accessories for Your Next Photo Op


What if I’m pregnant?
All the same principles apply (think moisture, posture, smirk/smile, and 4Cs) but for posture, make sure to hold your belly — no matter the size. (Unless, of course, you’re too early to be sharing the news.)
Jess recommends form fitting pieces, in black, to create a pretty silhouette for your baby bump.
Time to Practice
Please don’t just read these tips and think, “Ok, I’m ready for Thanksgiving!”
I strongly recommend getting comfortable with a few poses. Think about your circumstances: will you be posing with other people? Sitting? This will help you prepare.
Either pose in a full length mirror, or if you don’t have one, get out your phone, flip it to selfie mode, prop it on something at about your eye height (or the height that someone taking a photo would be at) and start posing.
Begin playing around with different poses. Try moving around to find what’s natural. Do a full smile, a smirk, tilt your head, feel confident in your posture, try moving your hands around until you find what’s comfortable.
When I “model” (loose term) for Collection36, it’s just me taking the photos, one at a time. I’ve had to practice and practice until I’ve felt comfortable, and the same will go for you.
Take some photos of yourself to figure out how you like to hold your body! To get the full effect, use the timer function on your phone or download the Snapi App, which allows you to signal to your camera when you’re read to snap a photo!
And remember, be natural and have fun :) If nothing else, you want your personality to shine.